
You shouldn’t wait for someone else to light up your space.
Something is empowering about taking control—turning a blank wall into something warm, safe, and beautiful. Outdoor Wall Lights do more than shine; they say you did this.
This guide will show you how to install outdoor wall lights independently—no electrician is required. With just a few simple steps, you can create an inviting glow you’ll appreciate every time the sun sets.
This DIY guide makes it easy and affordable to install outdoor wall lights independently, resulting in beautiful lighting you will enjoy every night.
Why Outdoor Wall Lights Are Worth the Upgrade


Adding outdoor lighting to your home is one of the easiest ways to improve safety and style. A well-lit front door or patio makes your home feel more welcoming, especially at night. It also helps you see better outside walking and can even scare off unwanted visitors.
➡️ Need more practical guidance? Check out this step-by-step tutorial on how to fit outdoor lights from DIY.com.
Outdoor wall lights don’t just light up your space but add beauty. They highlight your home’s design, boost curb appeal, and make it stand out best.
The best part? You don’t need to hire anyone to enjoy these benefits. With simple tools and the right guide, installing outdoor lighting is a DIY job anyone can do.
It’s a minor upgrade that significantly impacts your home’s looks, feels, and functions.
Ready to light things up?
➡️Want more easy upgrades? Discover our Farmhouse Kitchen Sink DIY Ideas to boost your interior charm too.
Benefits of DIY Outdoor Wall Lighting
Upgrading your outdoor lighting might seem small—but it can make a big difference. Good wall lighting makes your home feel safe, cozy, and welcoming. It lights up your entryway, patio, or garden so you and your guests can walk safely at night. It also adds charm, making your home stand out from the rest of the street.
Doing it yourself saves money. Hiring an electrician can cost a lot. But installing outdoor lighting on your own? That’s power in your hands. With the right guide (like this one), you’ll do it safely, quickly, and confidently.
For indoor DIY upgrades that radiate elegance, learn how to choose modern curtains for your living room.
And here’s a bonus—when you install it yourself, you can choose the style, the brightness, and placement. It’s all you.
Common Lighting Types: Sconces, Lanterns, and Floodlights
Let’s talk about style. Three popular types of wall lighting can work for your outdoor space:
- Sconces: These are small lights that sit flat against your wall. They’re great for entryways or patios where you want a soft, stylish glow.
- Lanterns: Classic and cozy, lanterns hang slightly off the wall. They add a warm touch and work well by doors or garden walls.
- Floodlights are bright, wide-angle lights that help light up large areas—like your driveway or garage wall. They’re also great for safety and motion detection.
Each of these can be installed easily with basic tools. Just choose what fits your vibe—and the spot you want to brighten.
Tools and Materials Needed for Installation


Before you start, make sure you have everything ready. Installing a light fixture doesn’t require fancy tools, but you need the right ones to stay safe and do the job correctly.
Wire Nuts, Mounting Brackets, and Electrical Boxes
First, let’s talk about the basics.
- Wire nuts are small plastic caps that twist onto wires to hold them together. You’ll use them when connecting the wire from the new light fixture to your home’s wiring.
- Mounting bracket: This metal piece holds your light fixture in place. It attaches to the electrical box on the wall. Most lights come with one, but check to be sure.
- Electrical box: This is where all the wiring lives. It’s usually already on your wall, hidden behind your old light. You’ll connect your new light to this box.
Make sure the electrical box is sturdy and rated for outdoor use.
Light Fixtures, Voltage Testers, and Safe Wire Connectors
Now for the rest of your toolkit:
- Light fixture: Choose one that fits your outdoor space and is rated for outdoor use. Look for waterproof or weather-resistant models.
- Voltage tester: This small tool tells you if wires are live. Before connecting the wire, always use a voltage tester to ensure the power is off. This is key for staying safe.
- Wire connectors: Some call these twist-on connectors, but they’re the same as wire nuts. Make sure they fit your wire size and are rated for outdoor conditions.
With these tools, you’re ready to get started. Safety first—and keep it simple!
Safety First: Turn Off the Power and Test the Wires

Turn off the power before you touch any wires or remove your old light fixture. This is the most crucial step. Go to your home’s breaker box and switch off the power to the area you’ll be working in. If you’re unsure which breaker it is, turn off the main power.
How to Safely Work with Outdoor Electrical Circuits
Once the power is off, double-check before doing anything else. Open the electrical box and gently pull the wires out. Don’t touch them yet. You’ll need a voltage tester to ensure there’s no live current.
A voltage tester is a small tool that tells if the wires still carry electricity. Hold it near the exposed wire ends. If it lights up or beeps, the power is still on. Go back and check the breaker.
When the voltage tester shows no power, you can move forward.
Using a Voltage Tester to Ensure No Live Current
Even if the light is off, the wires might still be live. That’s why you must test first. This tool helps protect you while you remove the old light fixture, mounting bracket, and wires.
Once you’re sure there’s no power, you can start connecting the wire for your new light fixture. Use wire nuts to twist wires together safely. Always double-check that the electrical box is dry, secure, and ready to hold the new parts. Safety matters more than speed. Take your time, and never skip the voltage tester step.
Installing the New Outdoor Wall Light Fixture


Now that the power is off and your tools are ready, it’s time to install your new light fixture. This part is simple if you follow each step carefully. Whether updating a porch light or adding something new near your garage, the process is the same.
How to Install Outdoor Wall Lighting on Brick Walls
Suppose your wall is made of brick or stone; mark where the outdoor light fixtures will go. Use a masonry drill bit to make holes for the screws. Then, insert wall anchors to keep your screws secure.
Ensure the electrical box sits flush with the wall and is ready for your mounting bracket. It must be strong enough to hold the light fixture, especially in windy weather.
Need extra guidance? Here’s how to attach lights to a brick wall from LightSupplier.
Securing the Mounting Bracket and Connecting the Wire
Next, attach the mounting bracket to the electrical box. This holds the new light fixture in place.
Then, carefully pull the wires from the box and start connecting the wires from your home to the wires on your fixture. Usually, it’s black to black (hot), white to white (neutral), and green or bare to ground. Twist them together using wire nuts and make sure they’re tight.
Attaching and Sealing the New Fixture Properly
Once the wires are connected, gently push them back into the box. Attach the light fixture to the bracket using the included screws.
Finally, seal around the base of the fixture with waterproof caulk. This prevents rain and bugs and helps your outdoor light fixtures last longer.
Flip the power back on—and enjoy your new light!
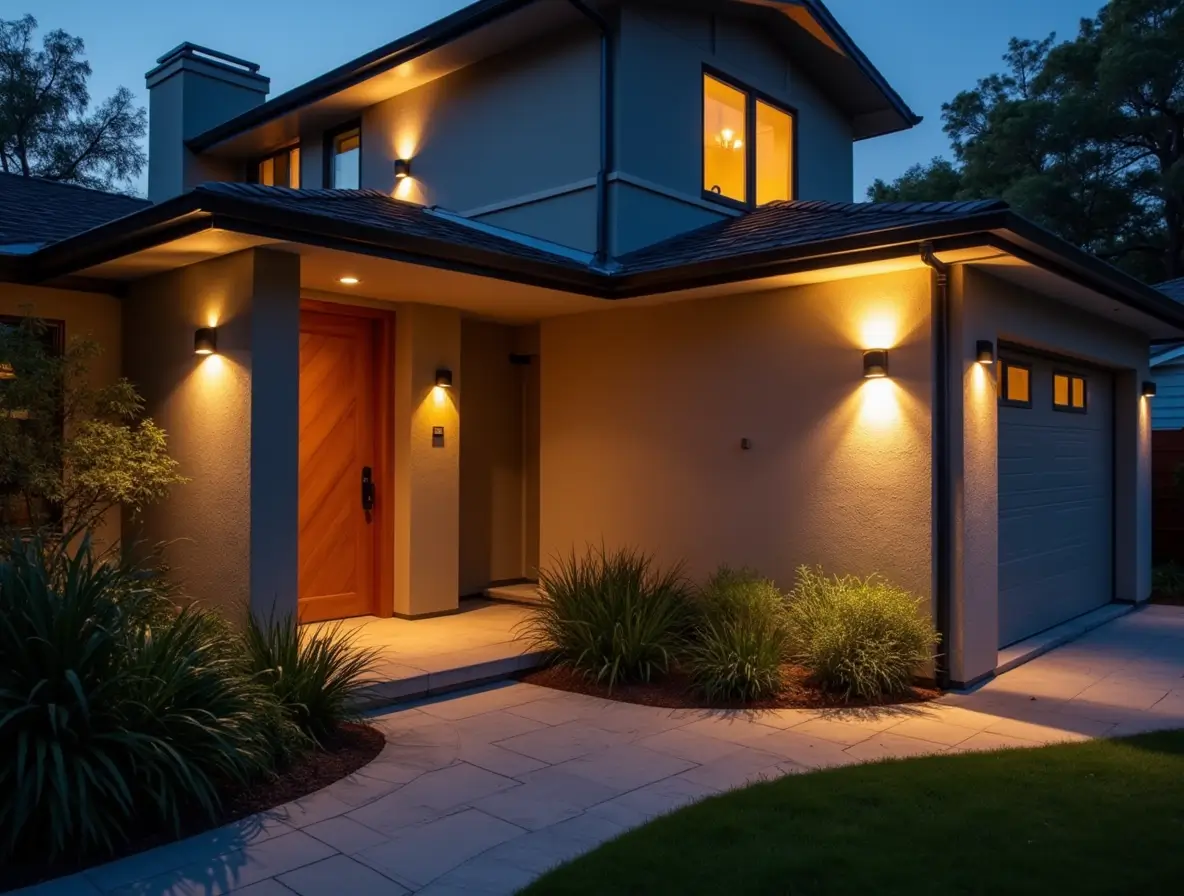
How to Choose the Right Placement and Size

Choosing where to place your outdoor lighting and how big it should be is as important as picking the style. The proper placement gives your home a balanced look while keeping it safe and well-lit.
Where to Position Outdoor Wall Lights Effectively
Good outdoor lighting should do two things: help you see and make your home look great. A smart rule is to place wall lights about 66 to 72 inches from the ground, depending on your door height.
If you’re lighting both sides of a door or garage, try to place the lights evenly for a clean, balanced look. On patios or garden walls, focus on areas where people walk or gather.
Avoid placing lights too high or far apart, creating dark spots and uneven lighting.
Designers at Pooky recommend placing wall lights around 8–10 feet apart for best results.
How Big Should Outdoor Wall Lights Be?

Size matters. For front doors, your outdoor lighting should be about 1/4 to 1/3 the height of the door. If you use two lights on each side, slightly smaller fixtures often look better.
For garage walls or open areas, go a little bigger to cover more space and make the design pop. Always measure before you buy!
This complete sizing guide from LightsOnline can help you find the perfect fit.
How Many Lumens Are Ideal for Outdoor Lighting?

Lumens measure how bright your light will be. For most homes, each fixture should give off 600 to 800 lumens for basic lighting. Want brighter paths or added safety? Go up to 1,200 lumens.
Remember, more light isn’t always better. Too much brightness can cause glare or waste energy. Pick just enough for the space you need to light.
Alternative Lighting Options for Outdoor Areas

Not every home needs the same kind of outdoor lighting. Sometimes, you want a softer touch. Other times, you need more brightness for safety. If wall lights don’t fully fit your space or style, here are some great alternatives.
Installing Solar-Powered Outdoor Lights
Solar-powered lights are easy to install and good for the planet. They use sunlight during the day and light up automatically at night—no wiring needed. Just place them where they can get 6 to 8 hours of sunlight.
These lights work great along walkways, near garden beds, or even on fences. They’re perfect if you want simple outdoor lighting without using electricity or hiring help.
Outdoor String Lights for Patios and Balconies
Want to make your patio or balcony feel cozy and magical? Try outdoor lighting with string lights. These lights hang easily from hooks, poles, or roof edges.
Choose weatherproof bulbs made for outdoor use. You can drape them in a zigzag or straight line—whatever fits your space best. They don’t give off much light but create a warm, relaxing vibe for nighttime gatherings.
Use clips or zip ties to hold the lights in place and avoid loose cords.
➡️ Want to bring harmony indoors too? Explore our Feng Shui Bedroom guide for restful balance and beauty.
Floodlights Over Garage Doors: When and How
Floodlights are a strong, wide-angle type of outdoor lighting. They’re best for areas that need bright light, like driveways or garages.
Install them above the garage door, pointing down. Choose motion-sensor models so they turn on only when needed—great for saving energy and adding security.
Just make sure to aim them carefully to avoid shining into your neighbors’ windows.
Pro Tips for a Seamless DIY Installation


You’ve got the tools, the light, and the plan—let’s ensure your DIY job looks professional. These simple tips will help your outdoor lighting look great and last longer.
Lighting Placement Ideas for Curb Appeal
Want your home to stand out? Use outdoor lighting to highlight its best features.
- Place lights near your front door and walkway to welcome guests.
- Light up trees or plants to add depth to your yard.
- Use soft lighting near windows to create a warm, cozy glow from outside.
Keep lights spaced evenly and make sure they match in size and style. This helps your home look polished and balanced.
Weatherproofing and Long-Term Maintenance Tips
Since your outdoor lighting faces sun, rain, and wind, it’s essential to protect it.
- Always use lights and parts rated for outdoor use.
- Seal gaps around the fixture with waterproof caulk to keep out moisture.
- Check the light bulbs and wires every few months. Replace any rusty screws or broken seals.
LED bulbs are a wise choice—they last longer and save energy.
Also, ensure your lights are tight and secure, especially if exposed to strong weather or on high walls.
So—what part of your outdoor space are you lighting up first? 🌟